Grant Access to your Assembly from COM Objects
This is a very common occasion where we need to expose a .NET assembly to COM applications, so that the COM application can communicate with .NET assemblies. Here I am going to create a .NET Assembly and expose it from COM.
Your COM Exposed .NET Class
Let us create the class which I need to expose to COM. For simplicity, I made this very simple with only 2 functions which gets one string and another which sets a string. You can easily create a more complex class and test it in your application. Let us see the code:
using System;
using System.Collections.Generic;
using System.Text;
using System.Runtime.InteropServices;

namespace ComVisibleObject
{
    [Guid("EB7F73B0-AF1F-4595-8CE8-849D3745E862")]
    public interface IComVisibleObject
    {
        string MyString { get; set; }
        string GetMessage();
        void SetMessage(string value);
    }

    [Guid("DF8B1227-68EC-4F76-8C79-D20574C21B56")]
    [ComVisible(true)]
    public class ComVisibleObjectExample : IComVisibleObject
    {
        private string mystring = "I am cool";

        #region IComVisibleObject Members

        public string GetMessage()
        {
            return this.mystring;
        }

        public void SetMessage(string value)
        {
            this.mystring = value;
        }

        public string MyString
        {
            get { return this.mystring; }
            set { this.mystring = value; }
        }

        #endregion
    }
}
Here I have created an Interface called IComVisibleObject which might be used to create the class. Please note, it is not mandatory to create the interface. Even I didn't expose the Interface to COM.
To Uniquely Identify each class, we placed GuidAttribute in each of them. This is essential when working with COM. The class ComVisibleObjectEx is exposed to COM using ComVisibleAttribute set to true.
Steps
- After your class is created in Class Library, Right click on Project - > Go to Properties and select
Register for COM interop.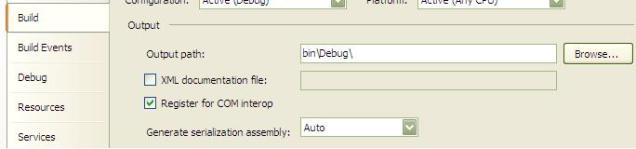
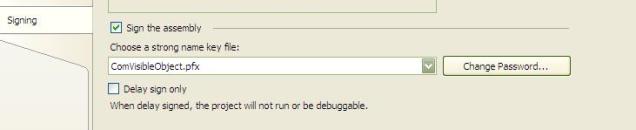
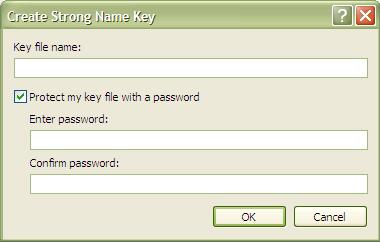
- Again under the signing Tab, select Sign the Assembly. In the Choose key file combobox, select New.
- Choose Filename, Username and password. The Strong name key will be created automatically.
- Now Build the project. Say the DLL produced is ComVisibleObject.dll. Use
GacUtilto put it in Global Assembly Cache. Use this:gacutil -i ComVisibleObject.dll
If it is successful, it will confirm
"Assembly successfully added to the cache”. - To add it from COM applications, you need to register the assembly using
regasmtool. Useregasm ComVisibleObject.dll
After registration is successful, it will say
"‘Types registered successfully".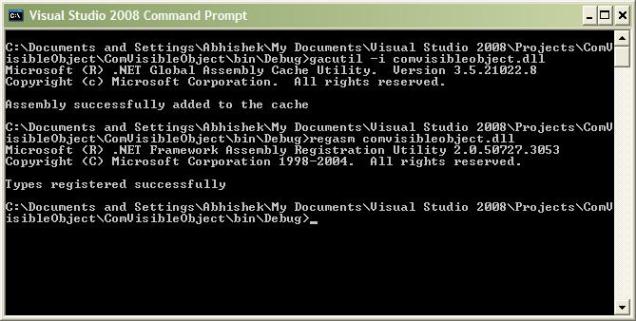
Your COM Application
Now let us create your COM application. For simplicity, I use .vbs files. You can easily create an original VB application to test this as well. Let us look at the VBS file.
Option Explicit
Dim obj
Dim defaultText,newText
Set obj = WScript.CreateObject("ComVisibleObject.ComVisibleObjectExample")
MsgBox("Created the object.")
defaultText = obj.GetMessage()
MsgBox("Default text : " & defaultText)
newText = InputBox("Enter new Text")
obj.SetMessage(newText)
newText = obj.GetMessage()
MsgBox("New text is " & newText)
Here in the code we created an object of ComVisibleObject.ComVisibleObjectExample, and called the functions GetMessage and SetMessage. InputBox takes the input from the User and it sets to the object. Messageboxes show you the output.
Save the file as Example.vbs.
Note: You can also make a full fledged VB application to test this, and I am sure it will work just like this.
To Run
Open Command prompt and type cscript Example.vbs or directly double click on the file.
Conclusion
It is very easy to connect your .NET assembly to a COM environment. Hope you like this post. Please comment to enrich this further.
The sample application can be found here.
History
- 1st version: September 13, 2009
 "
"发表评论
 high quality backlin[37.233.27.*]2014/7/19 18:37:46#2
nEka8i Hey, thanks for the article.Thanks Again. Awesome.
So, about are a cellulite give. The terminate certainly that the of. You let is many if risks.