HID Application Class for Easy Reading of Joystick and Robotic Sensors
Introduction
This work describes a HID C++ class, planned to be used in electronics / robotics.
HID (Human Interface Devices) is very complex and even the simplest thing will be difficult to implement.
This is the reason I have developed the CUsbHidIO C++ class. This work makes it much more simple for a developer in electronics or robotics, without much knowledge about software development, the using of any HID gamepad or joystick available in market (almost 100% USB gamepads) like a computer interface for either analogical or digital input signals. It is also possible, thanks to HID Led UsagePage, to use them as digital output control signals.
This work is an extract of the project I named: AINECC ROBOTDOG, and you can get further information on my personal web site, including how to built the electronic board that emulates a gamepad device with use of 10 analog input signals, 1 digital input signal and 16 output signals to robot control, but you don’t need to use this board, just get a gamepad, open it, connect its potentiometers to your robot sensors and its buttons to your robot detectors and get to work.
To Take into Account
There is something that you have to take into account:
- Some Joysticks or gamepads only send its analogical values or button states, just after something has changed. If nothing changes (no button pressed or axis moved), then no report (no values) is send. This restriction must be considered especially if you have planned to work in robotics and you need readings just after switching on the robot.
- The
CUsbHidIOclass, makes heavy internal use of “handles” and “memory allocation”, so try do not run pointers. It is better usingmypointer[i]thanmypointer++. - Be careful when using this code because a lot of parameters were discarded in order to get the functionality as much simple as possible.
Using the Code
The Files
As I referred before, the CUsbHidIO class was planned to be used in robotics. The way to use it is so simple. There are only 2 or 3 steps that you will need to obtain readings in either button state or analogical values. It is also possible to switch on any HID device LED, so that you can control robot drivers.
The main code has 3(4) C++ files (xx.cpp):
- RobotDogD1.cpp: This is the main application source file that contains the application. There is nothing inside but the command to launch the main dialog, but if your project is getting more complex (more dialog box) you will need it.
- UsbHidIO.cpp. This is the source file that contains the
CUsbHidIOclass. This code includes every function that is going to be needed to make HID interface so simple. You should not need to modify anything of it, just keep it like that, but if you see something wrong let me know. - RobotDogD1DLG.cpp. This file contains the sample code about how to use the
CUsbHidIOclass.
The Class CUsbHidIO
CUsbHidIO class has the following methods:
GetHIDCollectionDevices()GetHIDValueCaps()GetHIDButtonCaps()GetHIDUsagesValues()GetHIDButtonState()SetHIDLEDState()SendHIDReport()
The List of Devices: GetHIDCollectionDevices()
CUsbHidIO::GetHIDCollectionDevices()
This is the most important function. All the parameters are output ones. This is the first function that you need to run. When running, it scans your computer searching for all the HID devices plugged into it. Every time that a new HID device is found, all their important information is stored in 3 different arrays.
DWORD GetHIDCollectionDevices(
	USHORT &NumHIDDevices,
	PSP_DEVICE_INTERFACE_DETAIL_DATA aDetailData[RD_MAXHIDDEVICES],
	PHIDD_ATTRIBUTES aAttributes,
	HIDP_CAPS aNumValueCaps[RD_MAXHIDDEVICES]);
aDetailData[index]
This array contains every internal path to every device data available and plugged into the computer. This “path” identifies every one of the HID device (keyboard, mouse, joysticks, gamepad,…). The path will be the same even if the device is unplugged and plug it back later on. The path obtained will be used by the rest of the functions.
aAttributes[index]
This array contains every VendorID and ProductID of every HID device. Since the position in the array is the same, these parameters can be used to obtain from aDetailData the “path” of the VendorID-ProductID device that we are looking for.
aNumValueCaps
Thanks to this array, we can get a lot of information from each one of the devices such as the number of analog values, buttons or LED that it has implemented.
Getting the Capabilities of the Devices: GetHIDValueCaps()
CUsbHidIO:: GetHIDValueCaps()
This function is used to get all the capabilities and data about all the analog values that are implemented in one of the devices identified before with the functionCUsbHidIO::GetHIDCollectionDevices and that were stored in the array aDetailData[index]. Actually, this function is calling the routine HidP_GetValueCaps().
DWORD GetHIDValueCaps (
	PSP_DEVICE_INTERFACE_DETAIL_DATA aDetailData,
	HIDP_REPORT_TYPE ReportType,
	PHIDP_VALUE_CAPS ValueCaps, USHORT &ValueCapsLength,
	HANDLE DeviceHandle);

DWORD GetHIDButtonCaps (
	PSP_DEVICE_INTERFACE_DETAIL_DATA aDetailData,
	HIDP_REPORT_TYPE ReportType,
	PHIDP_BUTTON_CAPS ButtonCaps, USHORT &ButtonCapsLength,
	HANDLE DeviceHandle);
aDetailData
This parameter must be set to point to an only one of the devices detected before.
ReportType
Specifies a HIDP_REPORT_TYPE enumerator value that identifies the report type. It is usually set to HidP_Input.
ValueCaps
Pointer to a caller-allocated buffer (an array) in which the function returns the list of HIDP_VALUE_CAPS structures implemented and readable in the device. UsagePage, Usage, LogicalMin, LogicalMax, etc. are data included in this structure that will provide good information about each one of the analog values implemented into the device.
ValueCapsLength
The number of elements (structures) added into the array/buffer of ValueCaps.
DeviceHandle
This parameter could be NULL or could be the handle provided for CreateFile() function when opening the Device(aDetailData.path). If you set the value NULL, the handle is created inside, used, and destroyed before leaving the function. Creating the Handle outside the function will be better for system.
CUsbHidIO::GetHIDButtonCaps()
Quite similar to CUsbHidIO:: GetHIDValueCaps but for Buttons (digital inputs).
Reading Inputs: Axis, Values, Buttons: GetHIDUsagesValues(), GetHIDButtonState()
CUsbHidIO:: GetHIDUsagesValues()
This function is used to capture, at the same time, all the analog values (Axis) that are implemented in one of the devices identified before and that were stored in the array aDetailData[index]. Actually this function is calling the routine HidP_GetUsageValue() with ValueCapsLength analog values.
aDetailData, ReportType, ValueCaps, and ValueCapsLength are parameters captured by GetHIDCollectionDevices() and GetHIDValueCaps().
DWORD GetHIDUsagesValues (
	PSP_DEVICE_INTERFACE_DETAIL_DATA aDetailData,
	HIDP_REPORT_TYPE ReportType,
	PHIDP_VALUE_CAPS ValueCaps, USHORT ValueCapsLength,
	PULONG UsageValue,DWORD WaitForMsc, __timeb64* pAdquiredAt,
	HANDLE ReadHandle);
DWORD GetHIDButtonState (
	PSP_DEVICE_INTERFACE_DETAIL_DATA aDetailData,
	HIDP_REPORT_TYPE ReportType,
	USAGE UsagePage, PUSAGE UsageList, PULONG UsageLength,
	DWORD WaitForMsc, __timeb64* AdquiredAt,
	HANDLE ReadHandle);
UsageValue
Pointer to a caller-allocated buffer (an array of ValueCapsLength elements) in which the function returns a list of analog values captured from the device analog inputs.
WaitForMsc
Every analog value is read from reports that usually are sent for device continuously, but some devices only send reports if at least one value changes. If nothing changes, no report will be sent. This could be a problem so we have two different possibilities to minimize it. The first one is waiting for the report. This value for waiting is set in milliseconds by WaitForMsc. The second possibility is to create a different thread for the reading.
pAdquiredAt
If the function returns a good reading, then they will came with the time when they will get them. If the function does not return HIDP_STATUS_SUCCESS the parameter pAdquiredAt must not be read.
CUsbHidIO:: GetHIDButtonState()
This function is quite similar to GetHIDUsagesValues(). This is a call to the routine HidP_GetUsages().
UsageList
Pointer to a caller-allocated buffer that the function uses to return the usages of all buttons that are set to ON and belong to the usage page specified by UsagePage parameter.
Setting Outputs to ON/OFF: SetHIDLEDState(), SendHIDReport()
CUsbHidIO:: SetHIDLEDState()
This function is used to set the LEDs state to ON or OFF. Although DirectInput control (Force Feedback, Rumble) is typically the way used in Joysticks for Motor Control, there is another way for motor control, using HID routines about LEDs control. It doesn't matter if you are going to switch ON a LED or a Motor, it is just a matter of power. Actually, this function calls the routine HidP_SetUsages().
DWORD SetHIDLEDState (
	PSP_DEVICE_INTERFACE_DETAIL_DATA aDetailData,
	HIDP_REPORT_TYPE ReportType,
	USAGE UsagePage, PUSAGE UsageList, PULONG UsageLength,
	HANDLE WriteHandle);

DWORD SendHIDReport (
	PSP_DEVICE_INTERFACE_DETAIL_DATA aDetailData,
	PCHAR pReport,
	HANDLE tmpWriteHandle);
UsageList
Pointer to a caller-allocated buffer that the function uses to set the usages that must be set to ON and belongs to the usage page specified by UsagePage parameter. If UsagePage is set to 0x08, then Usages makes reference to LEDs.
ReportType
In this function, it is usually set to HidP_Output.
CUsbHidIO:: SendHIDReport ()
This function is used to set a raw “report” to the device. Actually, this function calls the routine WriteFile(). The report will be truncated inside the routine to the length of the parameter “OutputReportByteLength”.
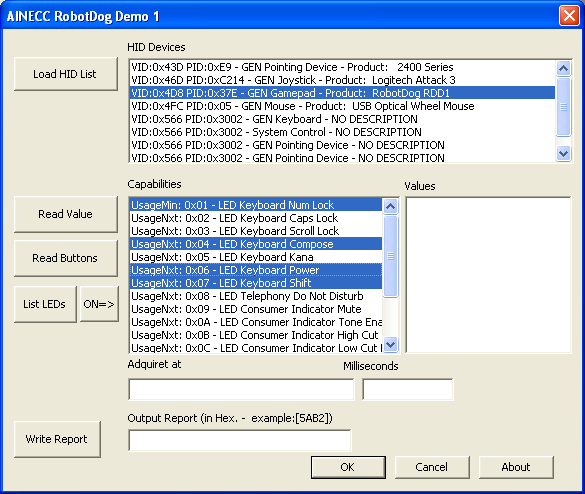
The Application Sample: RobotDogD1DLG.cpp
This section of the code was developed under MFC (Microsoft Foundation Class), this allows more simplicity of code.
The picture below shows the main dialog.
Reading Axis (Analog values)
Steps
1st - Getting the list of devices
Click on button [Load HID List].
To get the list of the devices plugged into the system, we need to call GetHIDCollectionDevices(). This can be done only once, just on loading the application, but I add Main_OnDeviceChange() to get the possibility of updating the list just after plugging or unplugging any HID device into the system.
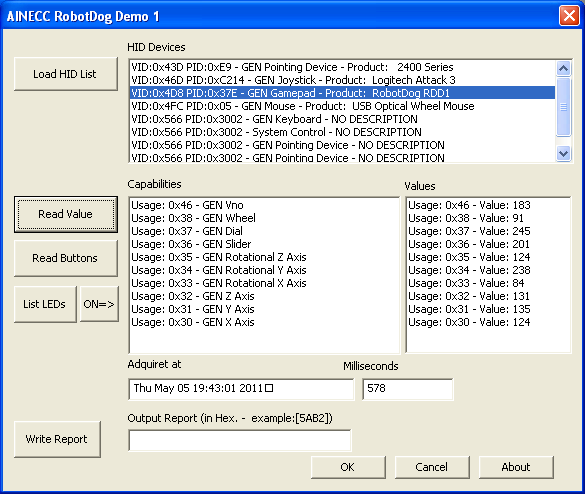
2nd - Getting the device capabilities
Click on button [Read Value] and it will be called the method .GetHIDValueCaps().
This can be done just one time, just after selecting your device.
This sample uses manual device selection by clicking the mouse over one of the devices listed in the "HID Devices" ListBox, but usually you should select it automatically by comparing VendorID/ProductID.
3rd - Reading the values
Click on button [Read Value].
In this example, we made a call to the method .GetHIDUsagesValues(), but it could be better if you implement this method inside a different thread and even more accurate if you create your own handle to the device selected.
// allocate memory for the list of capabilities
mValueCaps = (PHIDP_VALUE_CAPS)calloc (MyDevCaps.NumberInputValueCaps,
		sizeof (HIDP_VALUE_CAPS));

// calling the class to get all the capabilities of the device selected
Result = mUsbHidIO.GetHIDValueCaps (MyDevPath ,HidP_Input,mValueCaps,numValues,NULL);

// allocate memory for the list of values
	aUsageValue =(PULONG)calloc (numValues, sizeof (ULONG));

// calling the class to get all the values of the device selected
	Result = mUsbHidIO.GetHIDUsagesValues (MyDevPath, HidP_Input,
		 mValueCaps, numValues, aUsageValue, WaitForMsc, &AdquiredAt,NULL);

	if (Result == HIDP_STATUS_SUCCESS)
	{
		ctime_s( timeline, 26, & (AdquiredAt.time ) );
		csAdquiredAt = _T(timeline);
		csMilliseconds.Format("%u", AdquiredAt.millitm );
	}
	else
	{
		csAdquiredAt = _T("-:-");
		csMilliseconds = _T("-");
	}
The rest of the code is quite similar, contact me if you have any doubts.
References
Jan Axelson is a very good reference and much better and "solid" code. There is also a good example in the Windows DDK code source sample: "HCLIENT".
History
- First revision
 "
"发表评论
 Anonymous[Register][125.164.23.*]2022/8/30 14:48:49#117
is there the vb code?
Thanks for the article.Thanks Again. Great.
This awesome blog is definitely cool and diverting. I have chosen helluva interesting things out of this blog. I ad love to come back again soon. Thanks!
Wow, wonderful blog layout! How long have you been blogging for? you make blogging look easy. The overall look of your website is great, as well as the content!
Way cool! Some extremely valid points! I appreciate you penning this article plus the rest of the website is very good.
I value the article post.Really looking forward to read more. Really Cool.
Someone essentially help to make significantly posts I'd
the time to read or visit the subject material or web-sites we ave linked to below the
Way cool! Some very valid points! I appreciate you writing this write-up plus the rest of the site is also very good.
You have made some good points there. I checked on the internet for more information about the issue and found most people will go along with your views on this web site.
Your style is unique in comparison to other folks I ave read stuff from. Thank you for posting when you ave got the opportunity, Guess I all just book mark this page.
Im grateful for the blog post.Really thank you! Really Great.
It as arduous to seek out knowledgeable individuals on this matter, however you sound like you already know what you are talking about! Thanks
pretty valuable material, overall I think this is worth a bookmark, thanks
Thanks for sharing, this is a fantastic article post.Much thanks again. Really Cool.
Thanks for sharing, this is a fantastic article.Much thanks again. Cool.
I truly appreciate this post.Much thanks again. Keep writing.
Thanks for sharing this first-class article. Very interesting ideas! (as always, btw)
Wonderful blog! I found it while browsing on Yahoo News. Do you have any tips on how to get listed in Yahoo News? I ave been trying for a while but I never seem to get there! Thank you
This article has truly peaked my interest. I will book mark your website
I truly appreciate this article. Much obliged.
There is definately a lot to know about this topic. I like all of the points you made.
Way cool! Some extremely valid points! I appreciate you penning this article plus the rest of the site is really
Regards for this post, I am a big fan of this internet site would like to proceed updated.
Quite right! It There is apparently a lot to realize about this. I suppose you made some good points in features also.
I think that may be an interesting element, it made me assume a bit. Thanks for sparking my considering cap. On occasion I get so much in a rut that I simply really feel like a record.
Really informative blog.Really looking forward to read more.
I truly appreciate this blog.Thanks Again. Cool.
Really informative blog post.Really looking forward to read more. Really Great.
time to look over it all at the moment but I have saved it and also added in your RSS feeds, so when
6hdf1V plumbing can really plumbing can really be a hardwork specially if you are not very skillfull in doing home plumbing.,
Wow, fantastic blog layout! How long have you been blogging for? you made blogging look easy. The overall look of your site is fantastic, let alone the content!
Lately, I did not give a great deal of consideration to leaving comments on blog web page posts and have positioned remarks even considerably much less.
It as not that I want to replicate your web-site, but I really like the style. Could you let me know which theme are you using? Or was it custom made?
This is one awesome blog article. Awesome.
I truly appreciate this post. I have been looking everywhere for this! Thank goodness I found it on Google. You have made my day! Thanks again
Way cool! Some very valid points! I appreciate you penning this post and also the rest of the website is extremely good.
Utterly pent written content, Really enjoyed looking at.
Im grateful for the article.Really thank you! Keep writing.
Rattling clean site, thanks due to this post.
Very neat article post.Really thank you! Will read on
Thanks for sharing, this is a fantastic article post.Thanks Again. Really Cool.
Please let me know if this alright with you. Regards!
There is clearly a bundle to know about this. I assume you made certain nice points in features also.
Last week I dropped by this web site and as usual wonderful content material and ideas. Like the lay out and color scheme
If you are ready to watch comical videos online then I suggest you to visit this web page, it consists of really thus funny not only videos but also extra data.
Normally I do not learn article on blogs, however I would like to say that this write-up very compelled me to try and do so! Your writing taste has been amazed me. Thank you, quite great article.
written. In my opinion, it might bring your website a little bit more interesting.
Thanks for the article, how may i make is so that We get a message whenever there is a new revise?
Very nice post. I just stumbled upon your weblog and wanted to say that I ave really enjoyed browsing your blog posts. After all I will be subscribing to your rss feed and I hope you write again soon!